Showing posts with label Mexican. Show all posts

Monday, February 7, 2011

Barbeque Chicken Fajita Tacos

There are so many things you can make with chicken and so many ways to make fajita tacos as well! I wasn't sure what I wanted to make, but had some barbecue sauce and chicken so I came up with a chicken taco. I basted the chicken with the sauce and it gave it a hint of flavor without being overpowering. You really could use any sauce you like to baste the chicken with and come up with a tasty fajita taco (or quesadilla, or...). We served the fajita tacos with Mexican Rice and it was a very tasty meal. I found that a sweet sauce worked best for our tastes.


Ingredients (4 servings)

2 boneless, skinless chicken breasts
your favorite barbecue sauce
1 onion, cut in strips
1 green bell pepper, cut in strips
salt and pepper to taste
flour tortillas
shredded cheese
sour cream (optional)

Directions
Grill the chicken breasts until done, basting as they cook. Remove from pan to cool slightly before slicing (or shredding).

Add onions and peppers to skillet and saute over medium heat until tender. Add salt and pepper.


Heat up tortillas and assemble fajita tacos with meat, onion and peppers and cheese. Top with desired toppings (sour cream, guacamole, etc). You can also pour on a little more barbecue sauce to enhance the flavor.


ENJOY!

Sunday, January 23, 2011

Chipotle Grilled Chicken

I seem to spend a lot of time perusing food blogs and recipe sites these days! Sometimes I am on the search for something specific and other times just whatever seems to look good. I love spicy food and this Chipotle Chicken sounded like it was right up my alley- and it was!! This is a really easy recipe and the chicken can be used in a lot of different dishes such as tacos, quesadillas, sandwiches or just slice it up and eat it like this! Very yummy!!


Ingredients

2 boneless skinless chicken breasts
3 tbsp olive oil
2 cloves garlic, chopped
1 tbsp honey
1/4 tsp cumin
2-4 Chipotle Chiles in Adobo, roughly chopped (with seeds)
pinch of salt and black pepper
squeeze of lime juice


This is the type of pepper to use. I was able to find it in the Mexican Food aisle at our local Kroger Marketplace. Just make sure to wash your hands well after handling the peppers!


Directions
In a food processor or blender, add the olive oil, honey, salt, pepper, cumin, garlic and chopped chipotle peppers. Process until the marinade is thick but not chunky. Pour over chicken and marinate for 2 hours in refrigerator.

Remove to counter 30 minutes prior to grilling. Heat grill to medium high and grill until done (internal temperature of 170 degrees). Let rest for 30 minutes before slicing. (I didn't want to do this on the outdoor grill or pull out the George Foreman, so I just used a grill pan)


ENJOY!


Wednesday, January 19, 2011

Perfect Mexican Rice

Although I had a "good" recipe for Mexican rice, I was looking to tweak it just a little. The outcome? Perfect!! It was flavorful with a nice fluffy texture. Now to work on perfecting my flour tortillas! :-)

eta: I wanted to make this again, but did not have fresh tomatoes on hand. Instead I used a 15 oz can of diced tomatoes. I pureed them in the blender with the onion and it yielded 2 cups. I think that there must be more liquid in the canned ones becaus the finished product wasn't as "fluffy" as I like. So, you can certainly use canned tomatoes if that is what you have, but I would decrease the chicken broth by maybe 1/4 cup to compensate. But even if you make the rice with all of the liquid, the rice is still pretty tasty!!


Ingredients
2 ripe tomatoes (about 12 oz), cored and quartered
1 onion, quartered
3 medium jalapeno chilies (I left these out b/c I didn't have any)
2 cups long grain white rice
1/3 cup canola oil
4 cloves garlic, minced
2 cups low sodium chicken broth (or vegetable)
1 tbsp tomato paste
1 1/2 tsp salt

Directions
1. Preheat oven to 350 degrees.

2. Process the tomatoes and onion in a food processor (or blender) until smooth. You should have 2 cups liquid. If you have more than 2 cups, spoon off excess. If you have less than 2 cups, you can process another tomato or add a little water. It is important to have exactly 2 cups. If you are using jalapenos, remove seeds and mince flesh. Set aside.


3. Put the rice in a strainer and rinse under cold running water until the water runs clear (about 1-2 minutes). Shake rice to remove excess water. Removing as much water as possible is an important step as it will cause a lot of splattering when you put the rice in the oil (trust me on this).


4. Use a 12 inch oven safe pan that has a tight fitting lid. Heat oil in pan over medium-high heat about 1-2 minutes. The oil is ready when you drop in a few grains of rice and they sizzle. Add the rice and stir frequently until the rice is golden and translucent (about 6-8 minutes). Reduce heat to medium and add garlic and jalapenos; cook stirring constantly about 1 1/2 minutes. Stir in pureed tomatoes and onion, chicken broth, tomato paste and salt. Increase heat to medium-high and bring to a boil. Cover pan and transfer to oven.


5. The total cooking time is 30-35 minutes. Put the rice in the oven and set the timer for 15 minutes. Stir the rice after 15 minutes and return to the oven for another 15 minutes. After the full 30 minutes, stir rice. You can leave the rice covered on the counter until needed. Garnish with a squeeze of lime juice, cilantro, more jalapeno or whatever you prefer!

This is what the rice looks like after 15 minutes. You need to stir it to incorporate everything.

This is after stirring the rice.


This is after the full 30 minutes.

ENJOY!

Tuesday, January 11, 2011

Charro Beans

Charro beans are a nice alternative to the usual refried beans when making Mexican or Tex Mex dishes. When we eat out, my daughter loves Charro beans, so I wanted to try to make some at home. I searched through a lot of recipes and reviews but didn't find anything I liked exactly as written. So this is the recipe that I came up with. It turned out very tasty and works well as leftovers too. As I started cutting up the tomatoes, I looked down and saw this little smiling guy looking back at me :-)


Ingredients

1 lb dried pinto beans
water
6 oz salt pork or thick bacon diced
2 cups fresh tomatoes, chopped
1 cup onion, chopped (I used yellow)
2 jalapeno peppers (or more)
2 cloves garlic, minced
1 tsp salt
1/2 cup cilantro, chopped

Directions

Sort and rinse beans. Put beans in a large pot and cover with 6 cups water. Soak overnight.

(before soaking)
(after soaking overnight)

Drain beans. Add 6 cups fresh water and bacon. Bring pot to a boil then reduce heat and simmer for about 1 hour. Add tomatoes, onion, peppers, garlic and salt. Cook until tender about 1 1/2 to 2 hours. Add water as needed to keep the beans more soupy. (I didn't add too much water, so mine are a little less soupy- but make it however you prefer).

Add more salt if needed. Remove peppers completely or dice them up as a garnish. Add cilantro and serve.


ENJOY!

Wednesday, January 5, 2011

Guacamole

Just as there are many ways to make pico and salsa, there are many ways to make guacamole! The simplest way is to mash up the avocado and season with salt and pepper with a few squeezes of lime juice. For a creamier guacamole, stir in some sour cream. Both of these versions are great and very easy to prepare. If you are looking for something a little different that has more texture to it, you can try this one that I threw together. Although it tasted good right after mixing, it was way better after sitting in the fridge for a few hours. I was also very impressed with how it tasted and looked the next day. The lime juice is key for keeping the avocado from browning.


Ingredients

3 avocados
1 lime
1 tsp salt
1/2 cup diced onion (I used purple)
3 tbsp chopped cilantro
2 roma tomatoes, diced
1 tsp minced garlic

I think I learned the easy way to cut an avocado from watching Emeril years ago. Cut the avocado in half and remove the pit. Hold the half in your hand and use a sharp knife to cut it horizontally and vertically. Then you hold that over a bowl and push on the skin side until the avocado pieces fall into the bowl. It's a super easy trick, but not so easy to describe in words :~)

Another trick for the lime juice is to roll the (uncut) lime between the counter and your palm a few times to release some of the juice. Then cut in half and squeeze.

In a medium bowl, mash the avocado with lime juice and salt.

Add the remaining ingredients and mix well. You can serve this immediately, but refrigerating for at least 1 hour provides the best flavor.

I think this is one of those dishes that just does not photograph well...but the results are definitely yummy!!

ENJOY!

Tuesday, January 4, 2011

Pico de Gallo

I LOVE salsa and pico de gallo so I knew that I needed to make some to go along with our New Years Eve menu. Pico is another one of those dishes that you really don't need a recipe for, but sometimes it is nice to have a starting point of ingredients. You can adjust any of the ingredients to suit your own tastes. There are so many uses for pico other than just as a dip. You can add it to quesadillas, nachos, tacos, burritos or anything else you like. You do want to plan this one so that you have at least 3 hours to refrigerate before serving to let the flavors really blend.


Ingredients

6 roma tomatoes, diced
1/2 red onion, diced
1 to 3 tbsp fresh cilantro, chopped
1/2 jalapeno pepper, seeded and diced
juice from 1/2 lime
1-2 cloves minced garlic
pinch of garlic powder
pinch of ground cumin
salt and pepper to taste

Directions
Mix all ingredients together in a bowl. Refrigerate at least 3 hours before serving.

ENJOY!

Monday, January 3, 2011

Chicken Nachos

If you know me, you know I'll take any excuse for making Mexican food (or rather Tex-Mex). For New Years Eve, we had Tamales, Chicken Nachos and plenty of chips and dips! These nachos are so easy and not really one you need a true recipe for, but I thought I would share how I made them. I have listed the ingredients below, but the amounts will depend on how much you want to make. I made a large dinner sized plate full of nachos and it was just the right amount for this meal. You can easily customize this and make smaller plates depending on what people like on their nachos.


Ingredients

Boneless skinless chicken breast (I used 1)
Refried beans (I used about 1/2 cup)
Salsa
chopped pickled jalapenos (or fresh)
shredded cheddar cheese
tortilla chips
taco seasoning
black olives
sour cream
guacamole

Boil the chicken breast in a pot of water until done (around 20 min). Remove from pan and shred with two forks. Place shredded chicken in skillet and add 2 tbsp water and 1 tbsp taco seasoning. Cook over medium-low heat until water is absorbed.

Heat refried beans over low heat. Add 2 tbsp (or more) salsa to the refried beans. This gives it a good flavor and also thins it out enough to be able to spread easily.

Spread tortilla chips evenly on an oven proof plate or baking sheet. Spread refried beans over tortilla chips. Top with shredded chicken. Top this with sliced black olives (if desired), sliced jalapenos and shredded cheese. Place this in the oven under the broiler until the cheese is melted and bubbly. Topping suggestions are: pico de gallo, tomatoes, sour cream, guacamole, salsa. Customize it however you like and ENJOY!

Saturday, September 11, 2010

Conchas (Mexican Sweet Bread)

When my husband and I were dating, I remember his Mom would always buy Mexican Sweet Bread (Conchas) and Sweet Potato/ Pumpkin Empanadas. Yumm! I am still searching for an empanada recipe that I want to try, but I did find a good one for Conchas to share with you. My cinnamon loving son loved these- as did my husband's co-workers (oh and the rest of the family)! Imagine that....a recipe I didn't change :-)

(Yes, there are some "hidden Mickey's" in the batch :-) )

Ingredients
2 1/2 tsp yeast
1/2 cup warm water (110 degrees)
1/2 cup evaporate milk
3/8 cup white sugar
1 tsp salt
1/3 cup unsalted butter, melted
1 egg
4 cups all purpose flour
1/2 tsp ground cinnamon
2/3 cup white sugar
1/2 cup unsalted butter
1 cup all purpose flour
2 tsp ground cinnamon
1 tsp vanilla

Directions
1. In a large bowl, stir together the yeast and warm water. Let sit about 5 minutes. Mix in the milk, 3/8 cup sugar, 1/3 cup melted butter, salt, egg and half of the flour. Gradually mix in the remaining flour, and 1/2 tsp cinnamon. Turn the dough out onto a floured counter to knead as soon as it pulls together enough.

2. Knead for 6 to 8 minutes, until smooth and elastic. Place in a large greased bowl and turn the dough to coat. Cover, and let rise in a warm place until doubled, about 1 hour.

3. Make the topping while the dough rises. In a medium bowl, beat 2/3 cup sugar and 1/2 cup butter until light and fluffy. Stir in the flour until the mixture is the consistency of thick paste. Divide into two parts, and place one part in a separate bowl. Mix cinnamon into one half and vanilla into the other.

4. When the dough is done rising, cut into 12 even pieces (or more pieces for smaller Conchas). Shape into balls, and place on a greased cookie sheet, spacing about 3 inches apart. Divide each bowl of topping into 6 balls (or however many you are making), and pat flat. Place circles of topping on top of the dough balls and pat down lightly. Use a knife to cut grooves or designs in the topping. Cover and let rise until doubled, about 45 minutes.

5. Preheat the oven to 375 degrees. Bake for 20 minutes, or until lightly golden brown.


Enjoy!!

Tuesday, April 27, 2010

Chicken Taco Soup

This Slow Cooker Chicken Taco Soup is a recipe I have seen posted on various forums and have always wanted to give it a try. Since we are in Spring heading straight to Summer and 100 degree weather, we don't eat soups quite as much. But, a few weekends ago we had a little cool and rainy weather come through. So, I thought it was the perfect time for some yummy soup. I am so glad that I finally tried this soup- it is now one of my favorites! This soup was hearty and full of flavor and was even better as leftovers! My husband likes soup, but not quite as much as I do...but he did have seconds...or was it thirds?? This soup will definitely be made again and again!

**I wrote the original instructions below, but I changed it slightly. I checked the chicken after 4 hours and it was done. I removed the chicken and shredded it and put it in the fridge while the soup cooked another 2 hours. I stirred the chicken back into the soup and put the slow cooker on warm for about 30 minutes before serving. I'm not sure if it was the chicken I used or if my slow cooker maybe cooks faster. But I hate dry chicken, so I opted to do it this way.**


Ingredients
1 onion, chopped
1 (16 oz) can chili beans (I used hot)
1 (15 oz) can pinto beans (or black beans)
1 (15 oz) can whole kernel corn, drained
1 (8 oz) can tomato sauce
1 (15 oz) can chicken broth (or can of beer)
2 (10 oz) cans diced tomatoes with green chilies, undrained
1 package taco seasoning mix
3 boneless, skinless chicken breasts
shredded cheddar cheese
sour cream
crushed tortilla chips

Directions
1. Place the onion, beans, corn, tomato sauce, chicken broth and diced tomatoes in a slow cooker. Add taco seasoning, and stir to blend. Place chicken breasts on top and press down to cover. Cover and cook on low heat for 5 hours.
2. Remove chicken breasts and shred chicken with 2 forks. Return chicken to soup and cook 2 hours. Serve topped with cheese, sour cream and chips, if desired.
Just posting this makes me want another bowl!!
Enjoy!

Saturday, April 24, 2010

Chicken Chile Rellenos

On my quest for a recipe for Chile Rellenos, I was intrigued by this recipe for Chicken Chile Rellenos.
I had high hopes for this recipe, but unfortunately , as written, it didn't quite live up to those hopes. My first issue was chef error- I should have pounded the chicken a little more as specified in the recipe. I do like the idea of the recipe and can see using other ingredients to stuff the chicken with to make a yummy dish. If you like a more mild pepper taste, this may be perfect for you. But I tend to like things much spicier and would need to kick it up a few notches next time. We did like the texture and crunch of the batter. As I wrote below, I recommend dipping in flour, egg and then flour again to achieve a better crust. Although it wasn't perfect, it was a good recipe. Oh, and don't forget to remove the toothpicks before serving ;-)
Ingredients
4 boneless, skinless chicken breasts
salt and pepper
3/4 cup shredded Colby Jack cheese
3 tbsp diced onion
3 tbsp minced fresh cilantro
1 tsp chili powder
4 oz can diced green chiles
1 egg, beaten
1 tbsp milk
1/4 cup bread crumbs
1 tbsp flour
1 tsp chili powder
1/2 tsp salt
1 tbsp olive oil


Directions
1. Preheat oven to 350 degrees. Spray baking pan or shallow baking dish with cooking spray.
2. Rinse chicken and pat dry. Wrap in plastic wrap and pound to 1/4 inch thickness. Lightly sprinkle with salt and pepper.
3. In a small bowl, combine cheese, onion, cilantro, chili powder and green chiles. Divide this mixture evenly over flattened chicken and spread to within 1/4 inch of edge. Roll up chicken, folding in edges and secure with toothpicks.
4. In a shallow dish, combine the egg and milk. In another dish, mix together bread crumbs, flour, chili powder and salt. Disp the chicken rolls into the flour mix, then egg mix and again in flour mix. Place in prepared pan. Brush or drizzle with olive oil. Bake, uncovered for 25-30 minutes or until chicken is no longer pink. Makes 4 servings.


Enjoy!

Wednesday, February 24, 2010

Chicken Burritos

On my search for chicken enchiladas, I came across this recipe on Allrecipes.com. Now, I realize that they call it enchiladas, but in my mind, enchiladas are made with corn tortillas and burritos are made with flour. So, I'm going to call this a burrito dish to make myself feel better! I made some changes to the recipe as written below.

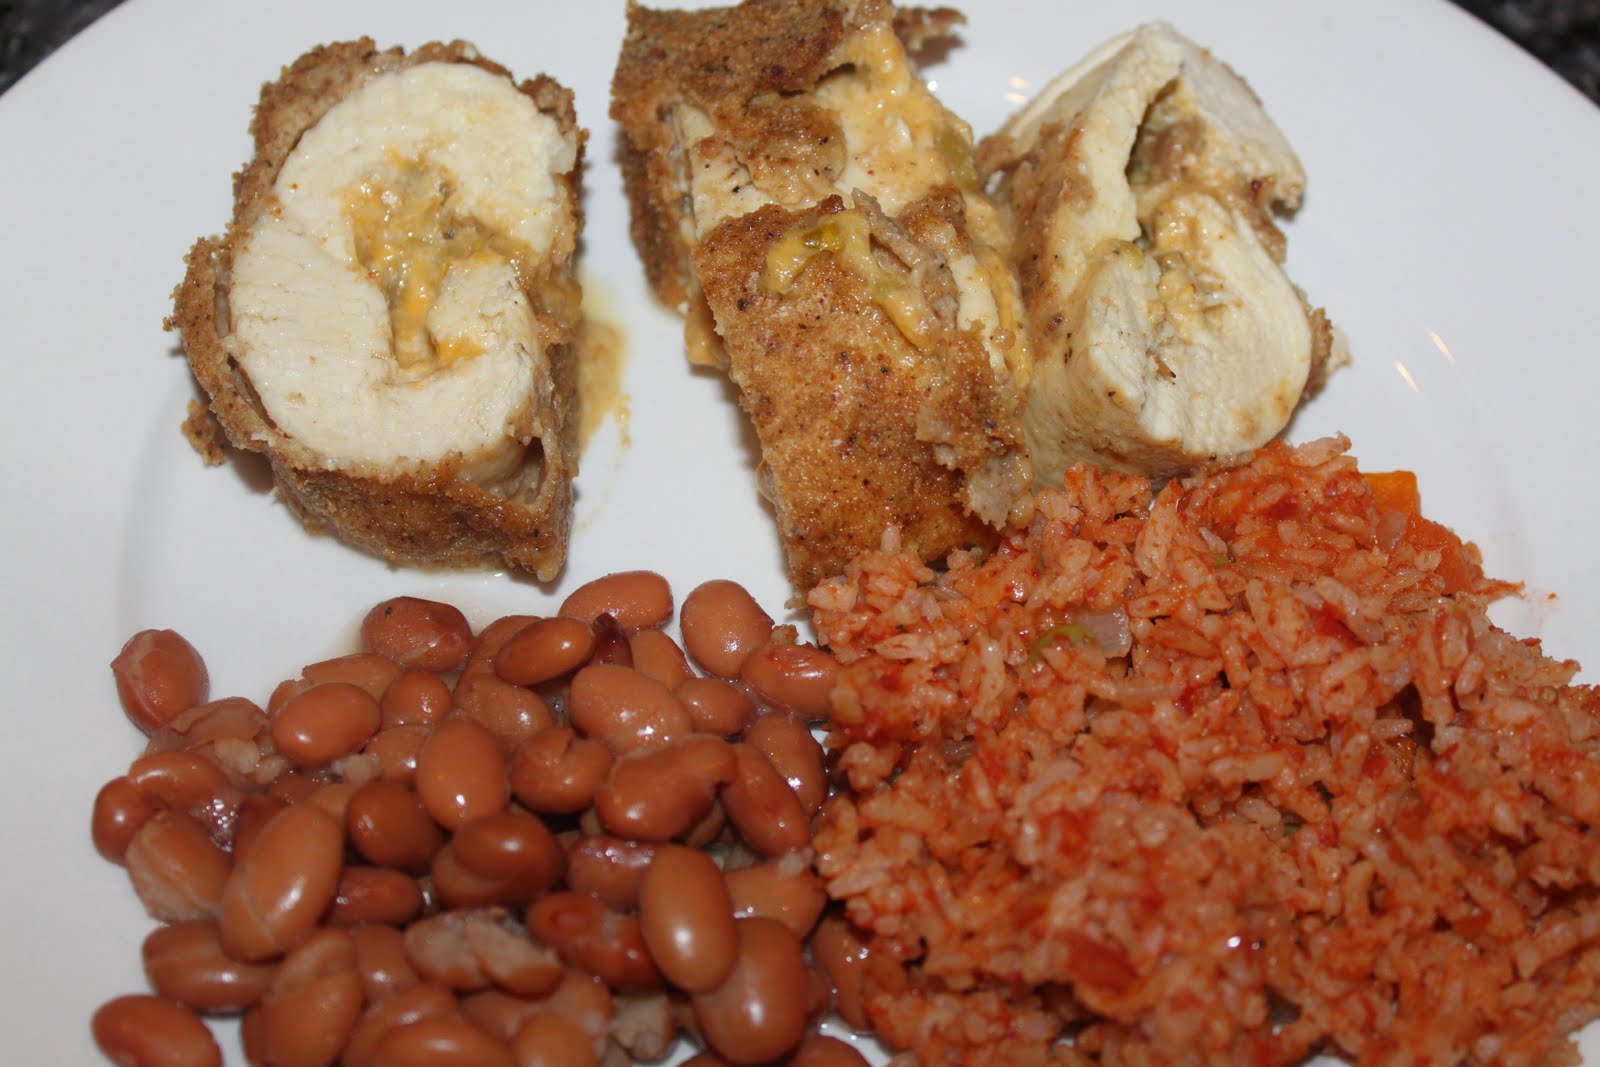
My husband and I both thought that the chicken filling had a good flavor. I wasn't crazy about the soup mixture for the topping and would change that to a homemade cheese sauce. Some reviewers thought this was spicy, but we didn't think it was spicy at all. I would kick up the spice factor with Rotel added to the chicken filling or maybe even some jalapenos on top. With a few changes, I think we would like this one more!


Ingredients
1 (10.75 oz) can cheese soup
small can of chile verde sauce
1/2 cup sour cream
1 tbsp margarine
1 onion, chopped
2 cloves garlic, minced
1 tsp chili powder
2 cups chopped cooked chicken breast
1 (4 oz) can chopped green chile peppers, drained
8 (8 inch) flour tortillas
1 cup shredded Cheddar cheese

Directions
1. Preheat oven to 350 degrees
2. Mix soup, sour cream and chile verde and set aside.
3. Melt margarine in medium saucepan over medium high heat. Add onion, garlic and chili powder, and saute until tender. Stir in the chicken, chile peppers and 2 tbsp of the soup mixture. Cook and stir until heated through.
4. Spread 1/2 cup of the soup mixture in a 9 x 13 inch baking dish. Spoon 1/4 cup of the chicken mixture down the center of each tortilla (can also top with a little cheddar cheese). Roll up tortillas, and place, seam- side down, in the baking dish. Spoon remaining soup mixture on top, and sprinkle with cheese.
5. Bake 25 minutes in the preheated oven, or until bubbly and lightly browned.


Enjoy!

Chicken Tacos

Sometimes you just need an easy meal with a few simple ingredients and this recipe fits the bill. I found this recipe in the Fix-It and Forget-It Lightly cookbook and it was also recommended on my favorite rewards site- Sunshine Rewards. I also like that it uses ingredients that I usually keep on hand so it can be a good fall back recipe when needed.


Ingredients (for 6 servings)
1 1/2 lbs frozen, boneless, skinless chicken breasts
14 1/2 oz can diced tomatoes with green chilies
1 package low sodium taco seasoning


Directions
1. Place chicken breasts in slow cooker.
2. Mix tomatoes and taco seasoning. Pour over chicken.
3. Cover. Cook on low 6-8 hours.
4. Serve in soft flour tortillas. Top with salsa, shredded cheese, guacamole and tomatoes.


**I usually use about 4 chicken breasts and mine seem to be done around the 4 hour mark. I usually take them out and shred the chicken with two forks. This chicken can be used in tacos, quesadillas or burritos.


Enjoy!

Mexican Rice

Although we love going out to eat Mexican food, we also cook it at home quite often. A few years ago, we saw an episode of America's Test Kitchen where they made Mexican Rice. When I looked the recipe up online, you were required to subscribe in order to view it...and I was much too cheap for that! It was also before the day of the "I can't live without it" DVR. So, we winged the recipe best we could. I've changed it a little here and there, but it is definitely our go to recipe for Mexican Rice. This recipe cooks partially on the stove and partially in the oven. While I am quite sure you could cook it entirely on the stove, I like being able to put it in the oven and not have to fuss over it the entire time.

Ingredients
2 cups medium or long grain rice
1 onion, chopped
3-4 garlic cloves, minced
1/2 tsp ground cumin
olive oil
1 to 2 tbsp tomato paste
1 (14.5 oz) can diced tomatoes or tomato puree
2 cups chicken broth
1/2 cup frozen peas and carrots (optional)

Directions
1. Put rice in a strainer and run cold water over it until the water is almost clear. Heat olive oil in an oven proof skillet (that has a lid) over medium heat. Add rice, onions, garlic and cumin and cook until tender and lightly browned; about 10 minutes.


2. Preheat oven to 350 degrees. While rice is browning, put the diced tomatoes in a blender and pulse until smooth. (if you use tomato puree, there is no need to blend). Once rice is browned, add tomato paste and 2 cups of the tomato mixture; stir and cook about a minute. Add 1 3/4 cups chicken broth and the peas and carrots and stir well. Add salt and pepper to taste. Bring to a boil and boil for 2 to 3 minutes.


3. Place lid on skillet and place in the preheated oven. After 15 minutes, stir rice. Cook for an additional 15 minutes. Let stand 5 minutes then stir and serve.


This rice also freezes well. To reheat, place frozen rice in a steamer bag and heat.


Enjoy!

Flour Tortillas

At least in my house, you can't have Mexican food without flour tortillas...and they have to be fresh! Years ago I tried my hand at making homemade flour tortillas. Little did I know at the time that I would completely spoil my husband (and now kids)- he does not eat store bought tortillas anymore. But honestly, I don't mind because they do taste much better and aren't hard to make at all. It does help that he is usually the tortilla cooker/flipper.

I have played with so many recipes to try to find one that suites our tastes. As much as he likes homemade tortillas, he isn't as picky about them as I am. I can't even begin to remember where I found a recipe and it really doesn't matter much as it has been changed so much over time that it isn't the same recipe anymore. Most tortillas recipes are very similar- just a little bit different measurements. You have to play around with them to get the texture that you want. I mostly change up the amount of fat and the baking powder to get the desired consistency.

Ingredients
1 3/4 cup all purpose flour
1/2 tsp salt
1/4 tsp baking powder
1/4 cup vegetable shortening
1/2 cup hot water

Directions

In a bowl, combine flour, salt and baking powder. Using a pastry blender, break up mixture until shortening is pea sized.

Add hot water and stir to combine.


Using your hands, form dough into a ball. Turn onto a lightly floured surface and knead dough until it is smooth- about 3 minutes.


Place ball of dough in bowl and cover with damp towel for about 15 minutes.


After the dough rests, divide it into 8 pieces and form into small balls.


Roll out dough to desired size. If needed, use flour to prevent sticking. Don't worry about making them perfectly round. After all, they are homemade, not machine made.


Heat a skillet over medium heat. Cook the tortillas on one side until they start to bubble, then flip and cook until they puff up.


Remove from skillet. You can place the cooked tortillas in a large zipper type bag to keep them warm/ soft.


Enjoy!

Thursday, February 18, 2010

Restaraunt Style Salsa Revisited

I know we are having Mexican food tomorrow night, so decided to make some more salsa. I wanted to show you a picture of what it looks like in the blender so that you won't be scared! It will fill the blender to the top, but it does all fit!


I pulsed this one a little less to get a chunkier style. While I liked the added texture, I found it to be a tad too watery. So, if you want a chunkier texture, go ahead and drain the 2 cans of Rotel before processing. If you want a smoother texture, you don't need to drain them (but won't hurt if you do). And while it is good straight out of the blender, it really is much better after sitting in the fridge for at least an hour. (But...I was realllyy hungry!)


I love these new Dipping Strip Tortilla Chips by Tostitos! It's the perfect size chip for dipping!! Another favorite is the Multigrain Tostitos! Great for nachos!

Wednesday, February 17, 2010

Mexican Cornbread

My husband loves Mexican Cornbread...the "plain" stuff just won't do for him! I have made this recipe for years. I believe that it started out with the regular cornbread recipe my Mom always used and I added from there! This is a very moist and flavorful bread that goes great with soups, stews, chili's and more!

Ingredients
1 cup flour
1 cup cornmeal
2 tbsp sugar
1/2 tsp salt
2 eggs
1 cup milk
1/2 cup vegetable oil
1 small can corn, drained
1 cup shredded cheddar cheese
1/2 onion,chopped
chopped jalapenos to taste

Directions
In a mixing bowl, stir together flour, cornmeal, sugar, baking powder and salt. In another bowl beat together eggs, milk and oil. Add to flour mixture and stir just until batter is combined. Add corn, cheese, onion and jalapenos. Pour into a 9x9 inch baking dish and sprinkle with shredded cheese. Bake at 400 degrees for 20-25 minutes.

**This recipe can easily be doubled and baked in a 9x13 inch dish for 30-40 minutes.
**I often use cream corn- if you want to use this, you need to decrease the milk to about 3/4 cup Leftovers also freeze well!


Enjoy!

Monday, February 15, 2010

Restaurant Style Salsa

I LOVE Mexican food- well it's technically "Tex Mex", but I love it all the same. I could seriously eat some form of Mexican food every day! That was really the only thing I craved when I was pregnant. However, I'm not sure it could really be classified as a pregnancy craving as I crave it all the time anyway! :-)

A good start to any Mexican meal is the chips and salsa! I love a good salsa and was almost giddy when I saw this recipe for "Restaurant Style Salsa". I knew that I had to give this one a try in my quest for a good salsa. I figure the upside to finding a good recipe is that I get to try a lot of chips and salsa and that's all good!

I am not a huge fan of cilantro and my husband has a strong dislike for the stuff (related to his days in the produce dept in college). So, I was a little concerned that the amount of cilantro was going to be overwhelming,. But to my surprise it gave it a good flavor and wasn't too much. You can however adjust the seasonings to your taste. I love spicy foods so I left the seeds in the peppers to up the heat a little. It definitely gives it a little kick- although I will probably add more peppers next time. I also debated on whether to drain the Rotel, but decided against it in the end. The only thing I will do differently next time is to divide the salsa in 2 batches and leave one batch a little chunkier.

Ingredients

1 can (28 oz) whole tomatoes with juice
2 cans (10 oz) Rotel
1/4 cup chopped onion
1 clove garlic, minced
1 whole jalapeno, quartered and thinly sliced
1/4 tsp sugar
1/4 tsp salt
1/4 tsp ground cumin
1/2 cup cilantro (more or less to taste)
1/2 whole lime juice


Directions

Combine all ingredients in blender or food processor. Pulse until you get the desired consistency. Adjust seasonings to your taste. Refrigerate for at least one hour. Serve with chips.


Grab some chips and dig in! Enjoy!